This text and its companion software refers to the little board ESP8266 NodeMCU. This board can operate as a WIFI access point or WIFI client (called then "station"). I has a integrated USB interface and can be powered over USB. The USB interface can be handled like a normal serial (Telnet type) interface if the appropriate Windows driver is loaded. This is not a pure WIFI chip: it is a full ARM based microprocessor (80 Mhz??) with additional features like GPIO, ADC, USB and flash memory. You can use it thus as a standalone processor with an associated WIFI component. For simple tasks Arduino or Raspberry are not needed.
My board came with a pre-installed AT interpreter, i.e. acting like a modem in the old days. I installed a LUA interpreter as a replacement for the AT interpreter. LUA is an interpreter language. Don't expect performance wonders when using LUA (or any other interpreters). LUA in combination with the USB-serial driver makes it however rather easy to test the different WIFI features and other aspects of the ESP8266 NodeMCU board. You can use Putty or TeraTerm on Windows to communicate with the board. My board used 9600 baud as the default bit rate.
The documentation for the LUA features is - as usual in the small computer market? - rather confusing, incomplete or wrong. Just to given you an example: the newest LUA version did not include the DHCP module although it is documented.
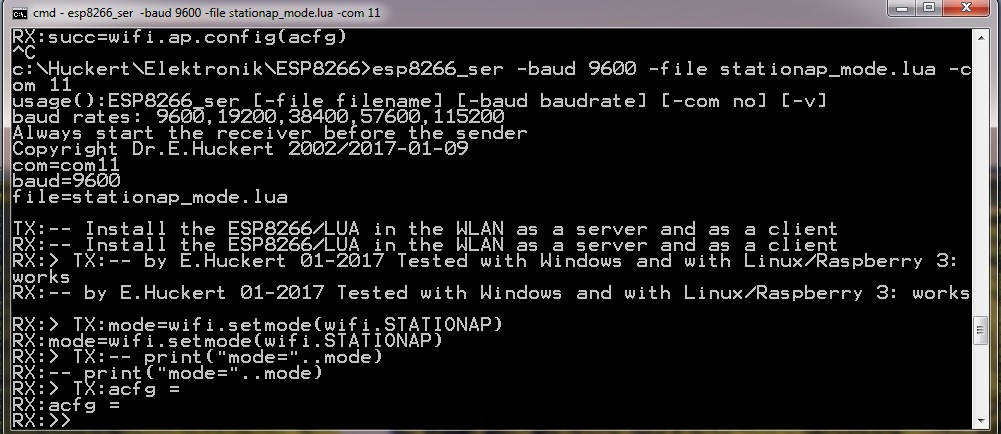
I wrote a simple serial uploader called esp8266_ser.exe running under Windows. There are other uploaders on the Internet. Why didn't I choose them? The main reason is: I didn't want to install large packages including other software components that I never need: Java or Python.My program esp8266_ser.exe acts like a non-interactive version of Putty or TeraTerm. You may find upload options in these programs - I didn't get them working.
You find my Windows executable and the C++ source code (a main program and a RS232 class) in this zip file. The zip file also includes a LUA program called stationap_mode.lua. It has the following features:
A short comment for people that want to modify my C++ code: please note that COM ports greater or equal than COM10 under Windows must be handled in a special way! You may find this in method HU_RS232::open_line() in source module hu_rs232.cpp. This is an annoying bug (or feature) in Windows. I spent two days of my life to find that out.
You see that it is easy to load small programs into the board. You can also load or overload the startup program used by the ESP8266/NodeMCU. This program must be placed as a file in the flash and must be named "init.lua". It is executed when you power up the board - with or without USB. My version of init.lua ist nearly identical with the program stationap_mode.lua contained in the zip file. It builds a combined WIFI UDP server and client (mode wifi.STATIONAP). You may control this with my programs udp_server.exe or udp_client.exe (see my page TCP and UDP). The essential point is: open the file init.lua at the beginning of the program, add lines to this file via the LUA statement writefile() and at the end close the file. Then disconnect the board and reconnect it: the file init.lua should be executed. With this sample program it receives UDP messages on port 9514 and sends messages back on port 9515. I have used fixed IP adresses in this sample - no broadcast messages here.
The following picture shows my software when uploading a LUA program into the ESP8266 board:
Note that I haven't included any transmission security features (checksums etc.) in the code. For serious applications this should be added.
If you have no USB/serial connection in your production environment but a working WIFI interface with an UDP receiver as in my program you can load software in the board by just using the UDP interface!. The program init.lua must then be enhanced a little bit - the essential features are already included.
For a similar approach using 433MHz devices see
here.
I have decided to control my player via WLAN and traditional WEB and Linux mechanisms. Fortunately the new Raspberry Model 3 has two important features:
My requirements are rather simple: I want to start a song (this is "play along" music, i.e. music without the solo voice). This could be achieved via a simple player invocation. As player we could use commands like aplay or omxplayer on the Raspberry 3 side. This player command must be started in a CGI program running on the Raspberry.
Things are getting more complicated however if you want to stop a song that is actually played. The request for stopping an actual play process is a hard request: if you make an error on the scene than a song you have started must be stopped immediately. The standard players like aplay or omxplayer offer no easy way for being stopped during the play process. Control-C is not possible as you don't sit directly on the Raspberry. You could traverse the process list on the Raspberry and then kill the player process. I found that this wasn't an elegant solution.
I always prefer simple and robust solutions. I avoid if ever possible JAVA or PHP or other fancy tools. "Robust solution" essentially means: you must be able to control it without complicated procedures as you are the musician on the scene - you have to do better things than struggling with electronic devices. The best solution I found was this:On the client side (in the browser) I use a very simple HTML form :
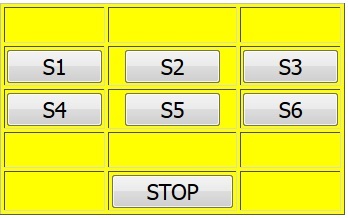
This HTML form is sent back to the client after having completed the CGI program. The number of buttons/songs is not limited to six as in this sample. The form can send song numbers or a STOP command to the WEB server in which the CGI program runs.
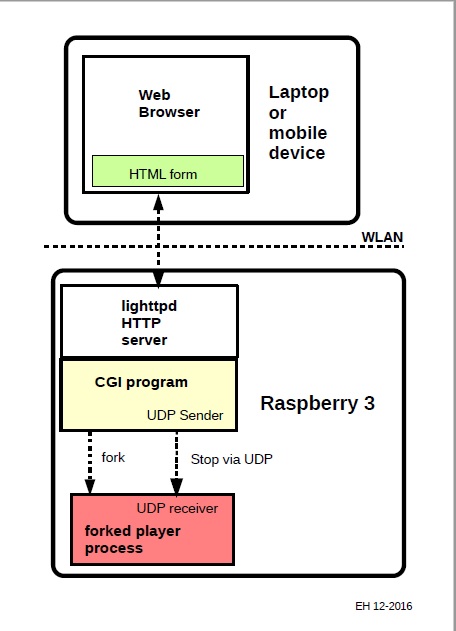
Note that I play only WAVE file, not MP3 files. Everything is based on the ALSA sound architecture (pulseaudio not needed). It is much easier to implement a WAVE player than a MP3 player. WAVE files can easily be ripped from AUDIO CDs (in LINUX: see command line program abcde). But the mechanisms described here can also be used with MP3 players if they have the ability to be interrupted during the play process. The wave files must be loaded on the Raspberry3 in a preparatory step. You can use ftp, scp, curl, FileZilla or other transfer programs. Binary transfer mode is requested. Be sure that the player can find and use them.My solution is shown in this image:
One strange problem should be mentioned: this solution works only partially with other WEB servers like apache2. I have used lighttpd as WEB server and it worked perfectly. It seems that forked processes are handled differently in different WEB servers.
More or less the same program can be used as kernel for a different approach: instead of using WEB HTTP requests (a form and a CGI program) the linux program r3cgifork could also be used as a pure UDP server. You need then on the client side a GUI component that sends UDP commands via WLAN to the pre-started player program on the Raspberry side.
After having read a lot of articles on Bluetooth I found a very helpful article by Albert Huang on http://people.csail.mit.edu/albert/bluez-intro/. The server and client used in this article are based on his sample programs.
Why not follow the standard Bluetooth mechanisms? pairing devices, allowing access etc. Here are the reasons:
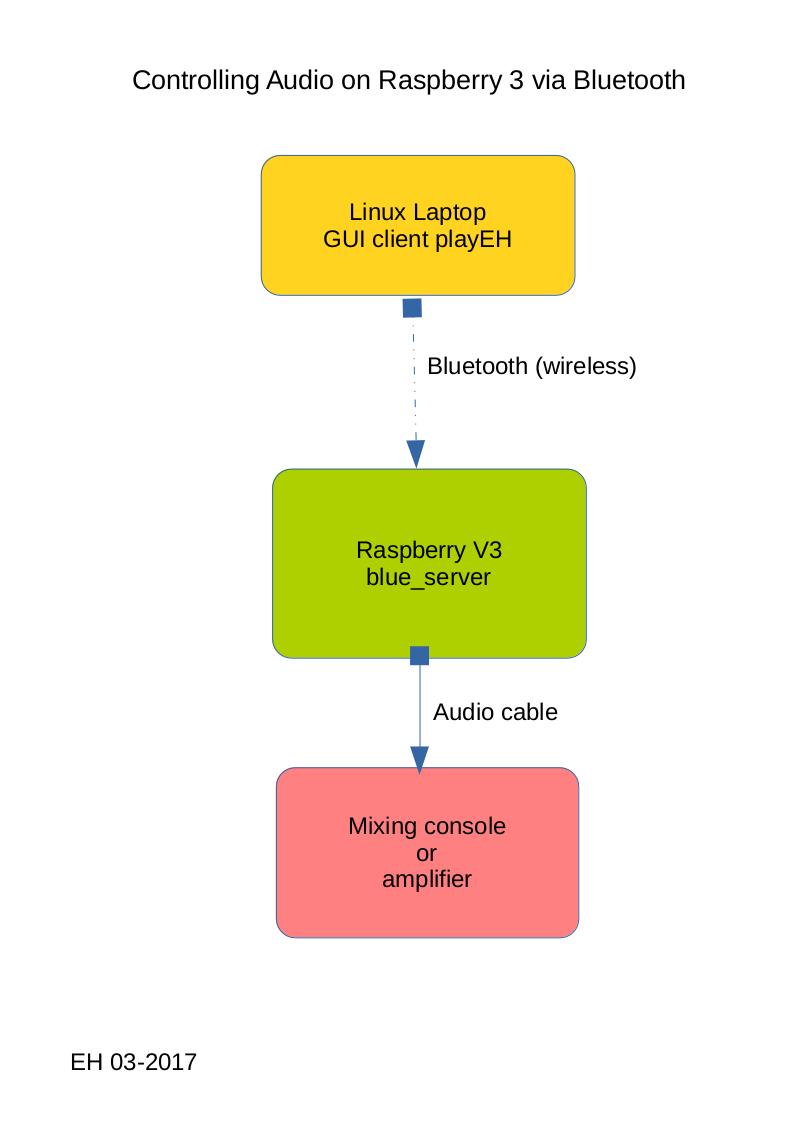
My solution is sketched in this picture:
Linux uses generally the Bluez stack and the Bluez-related utilities to get control over the Bluetooth device. You may have to install them via sudo apt-get install .... Please verify that the static library libbluetooth.a can be found by the GCC compiler/linker. You need this library for the Bluetooth server and also for the Bluetooth client. You also need include files for Bluetooth. These include file are generally found in package libbluetooth-dev.
This solution is by the way a pure Bluetooth-socket approach (RFCOMM sockets are used). The usual Bluetooth daemons like bluetoothd or obexd are not needed.
Bluetooth must be configured the same way on both sides (server and client). The commands use a Bluetooth device that is called here hci0. You may find out how it is called in your case by issuing this command:
hciconfig -a
The output for this command also tells you what your Bluetooth address is (item "BD Address"). For my Raspberry 3 this is "B8:27:EB:E1:8F:D8".
If necessary replace hci0 by the device name In order to establish a connection even on the lowest (ICMP) level we must configure the Bluetooth devices on both sides as root:
sudo hciconfig hci0 piscan noauth up
In some cases it may be necessary to switch down the Bluetooth interface by a command like sudo hciconfig hci0 down followed by the command above to switch the device on. You should place this command in your startup profile (ex. in .bash_profile) - and don't forget the "sudo" prefix command.
You can control the Bluetooth devices on both sides with the command l2ping:
l2ping B8:27:EB:E1:8F:D8
If this works for both sides we can continue with the real connection by first starting the Bluetootth server on the Raspberry 3 side:
./blue_server &
We can place the server start in our login startup file, i.e. in .bash_profile or .profile depending on our basic shell. The Bluetooth server is a simple command line program: no graphical interface is needed. X11 (the Windows equivalent under Linux) is not necessary - it should not disturb however.
On the client side (this is here my DELL laptop under Ubuntu) I start the Bluetooth client. In this case this is a "rich" client called playEH written by me in C++ with wxWidgets and linked statically. This client has 9 song buttons, 4 volume buttons and a "STOP" button to stop the song that is actually played. It also has a list box showing the commands sent to the server. The client uses a very simple ini file (see sample in the ZIP file) specifying the Bluetooth address of the server(i.e. the Raspberry). It can output UDP based trace messages (see my UDP listeners on my WEB pages). The client looks like this:
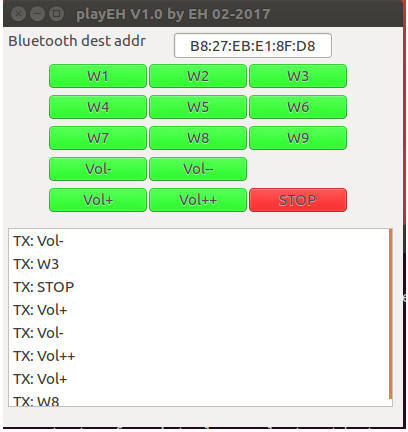
The logic behind these buttons is basically simple but may be complex in the details:
A word on the audio quality on the Raspberry 3: it is certainly not HI-FI. For my purposes (I am an active amateur Jazz musician) it is however OK. Be sure to use an amplifier with a low-impedance input. My favorite stage amplifier has a high-impedance input: in this context the Raspberry produces too much noise. Fortunately the AUX input on this amplifier was good enough for the Raspberry 3. Generally spoken the sound card on the Raspberry produces much noise before and after the play process. I am not sure whether this is an hardware problem or an ALSA problem.
I use in my environment an own ALSA player called playw. You can use instead the standard ALSA command line player - normally aplay.
The zip file contains all the required sources and even a binary:
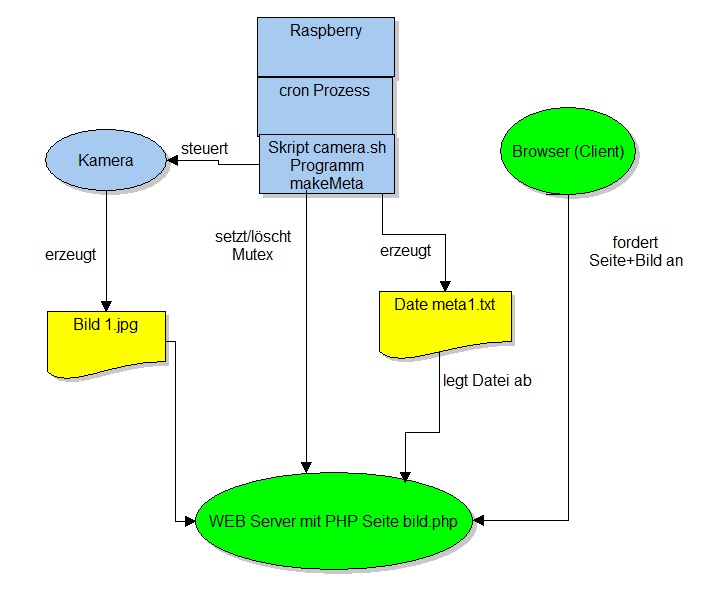
Assume now that you have already a registered web address (like me). Then the server is normally provided by the Internet provider. But you don't have the right to connect on this server a web cam. It is probably not possible to do this because the Internet provider is far away from your home.
This is why I try here (PDF article, in German) to go the other way: using my existing web space on a server under the control of my internet provider. Note that this solution is much more complicated and requires a skilled programmer with knowledge in
My solution roughly works as follows:
Corrections and enhancements
In the mean time I found that my project contains an error: the auxiliary program wput (used for the upload of data in script camera.sh) seems to produce sometimes damaged images on the server. I have now replaced wput by curl. I haven't noticed any transmission errors since that replacement. The curl syntax I use is the following for the upload:
curl -u USER:PASSWORD -T /home/pi/camera/1.jpg ftp://www.SERVER.com/DIR1/DIR2/1.jpg
The Arduino has no true analogue output pins. It has PWM pins instead. PWM output is a rectangle wave with variable durations for high pulses and pauses. It can be converted to an sine-like signal with simple RC filters or more complicated tracking filters. PWM signals are mainly used for the control of servos.
If you want to produce triangle, sawtooth, sine or even more exotic wave forms then a DAC (Digital to Analogue converter) is the solution. The DAC MCP4802 is an 8 Bit converter controlled via SPI (Serial Peripheral Interface). It contains two DACs, has only 8 pins, runs with 5 Volt and costs ca. 1.5 Euros. Microchip (the chip producer) offers similar chips with more pins and higher precision that could be used with the same sketch (10 Bit: MCP4812 and 12 Bit: MCP4822). Note that using a DAC via the (serial) SPI protocol is not the fastest but certainly the simplest solution.
You will find the commented Arduino sketch (the source code) here. The source code contains the pin connection information. It also says how the frequency can be changed by modifying the increments and decrements in the loops. This simple sketch only uses one of the two DACs on the chip.
Sawtooth signals can easily be produced by eliminating one of the two loops. If you want to produced more sophisticated wave forms then a table based solution would be better than this simple loop based approach. A sine like wave form can be obtained by reading the input values for the DAC from a table containing pre-computed sine values.
A voltage variation as provided by a DAC can also be used for other applications: it can control VCAs (voltage controlled amplifiers), VCFs (voltage controlled filters) or VCOs (voltage controlled oscillators).
My measurements show that the output is perfectly linear: a value of 1 in the input produces 0.008 V output. An input value of 255 consequently produces 2.04 V output.
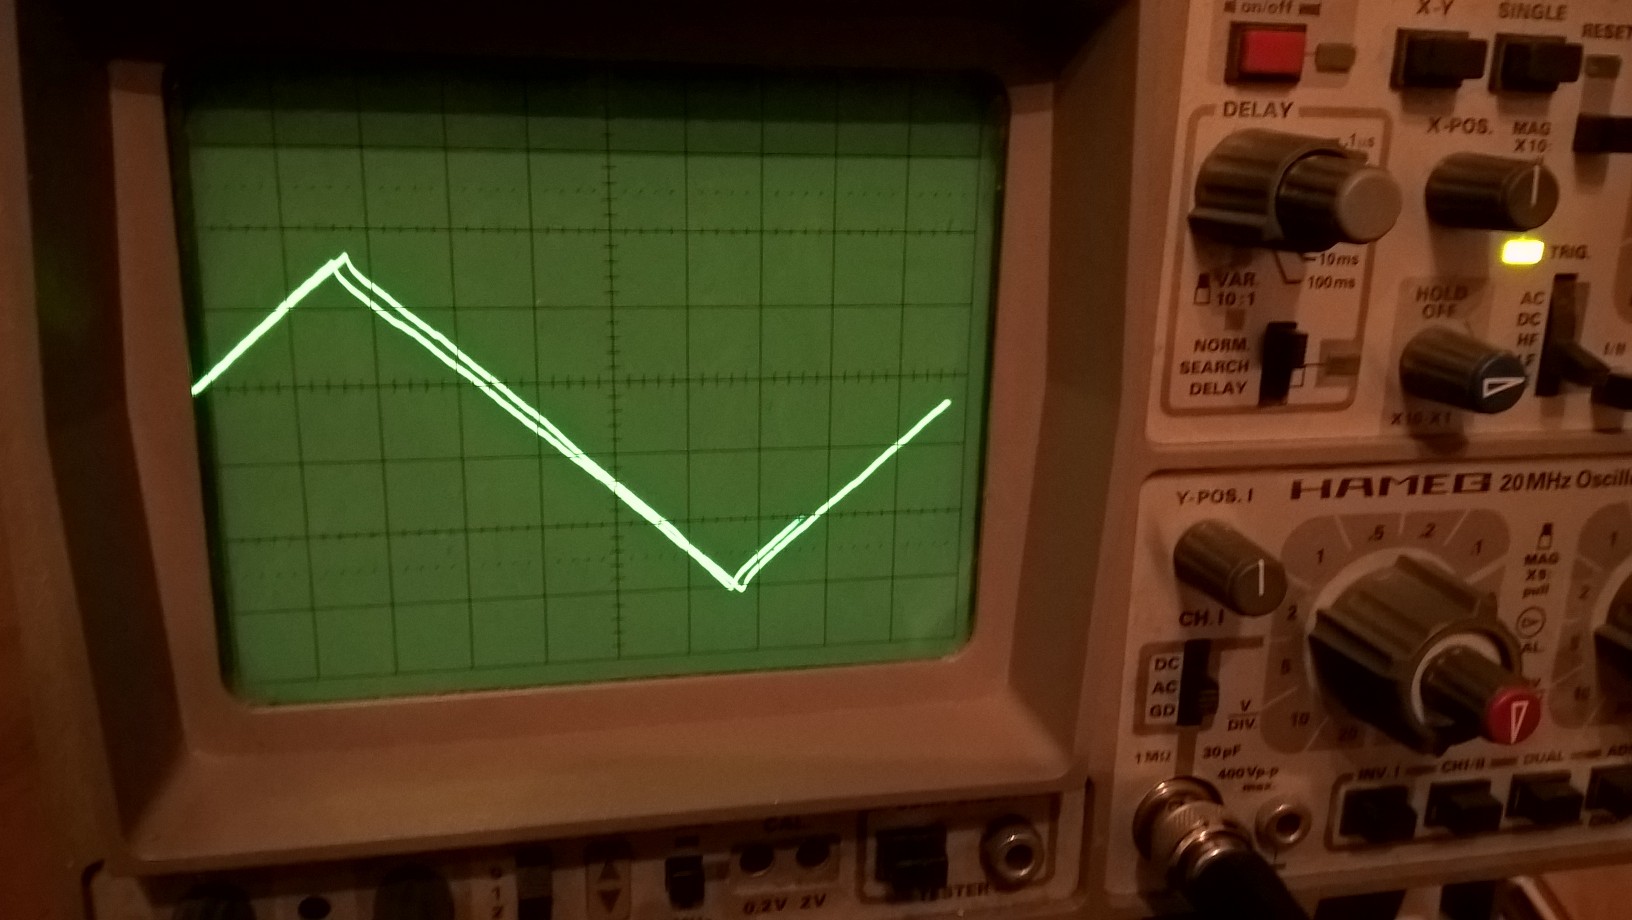
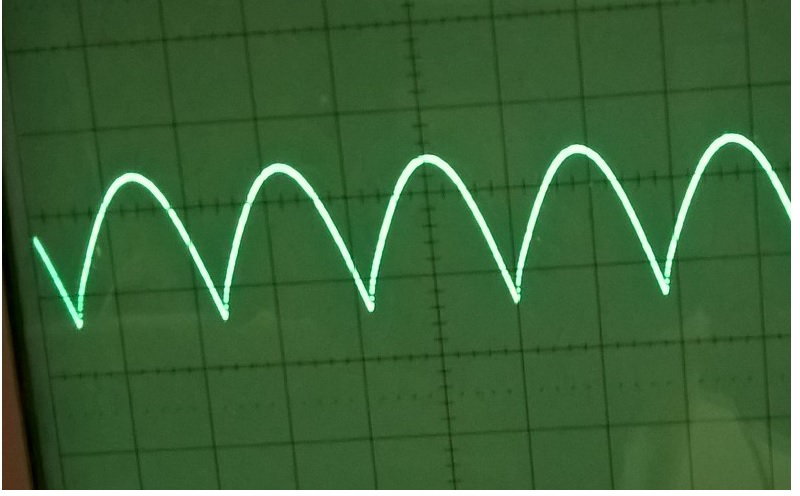
This picture taken from my old HAMEG oscilloscope shows the typical triangle wave form produced by the simple sketch. A complete cycle is run in 18.4 ms which gives 53.3 Hz for the frequency:
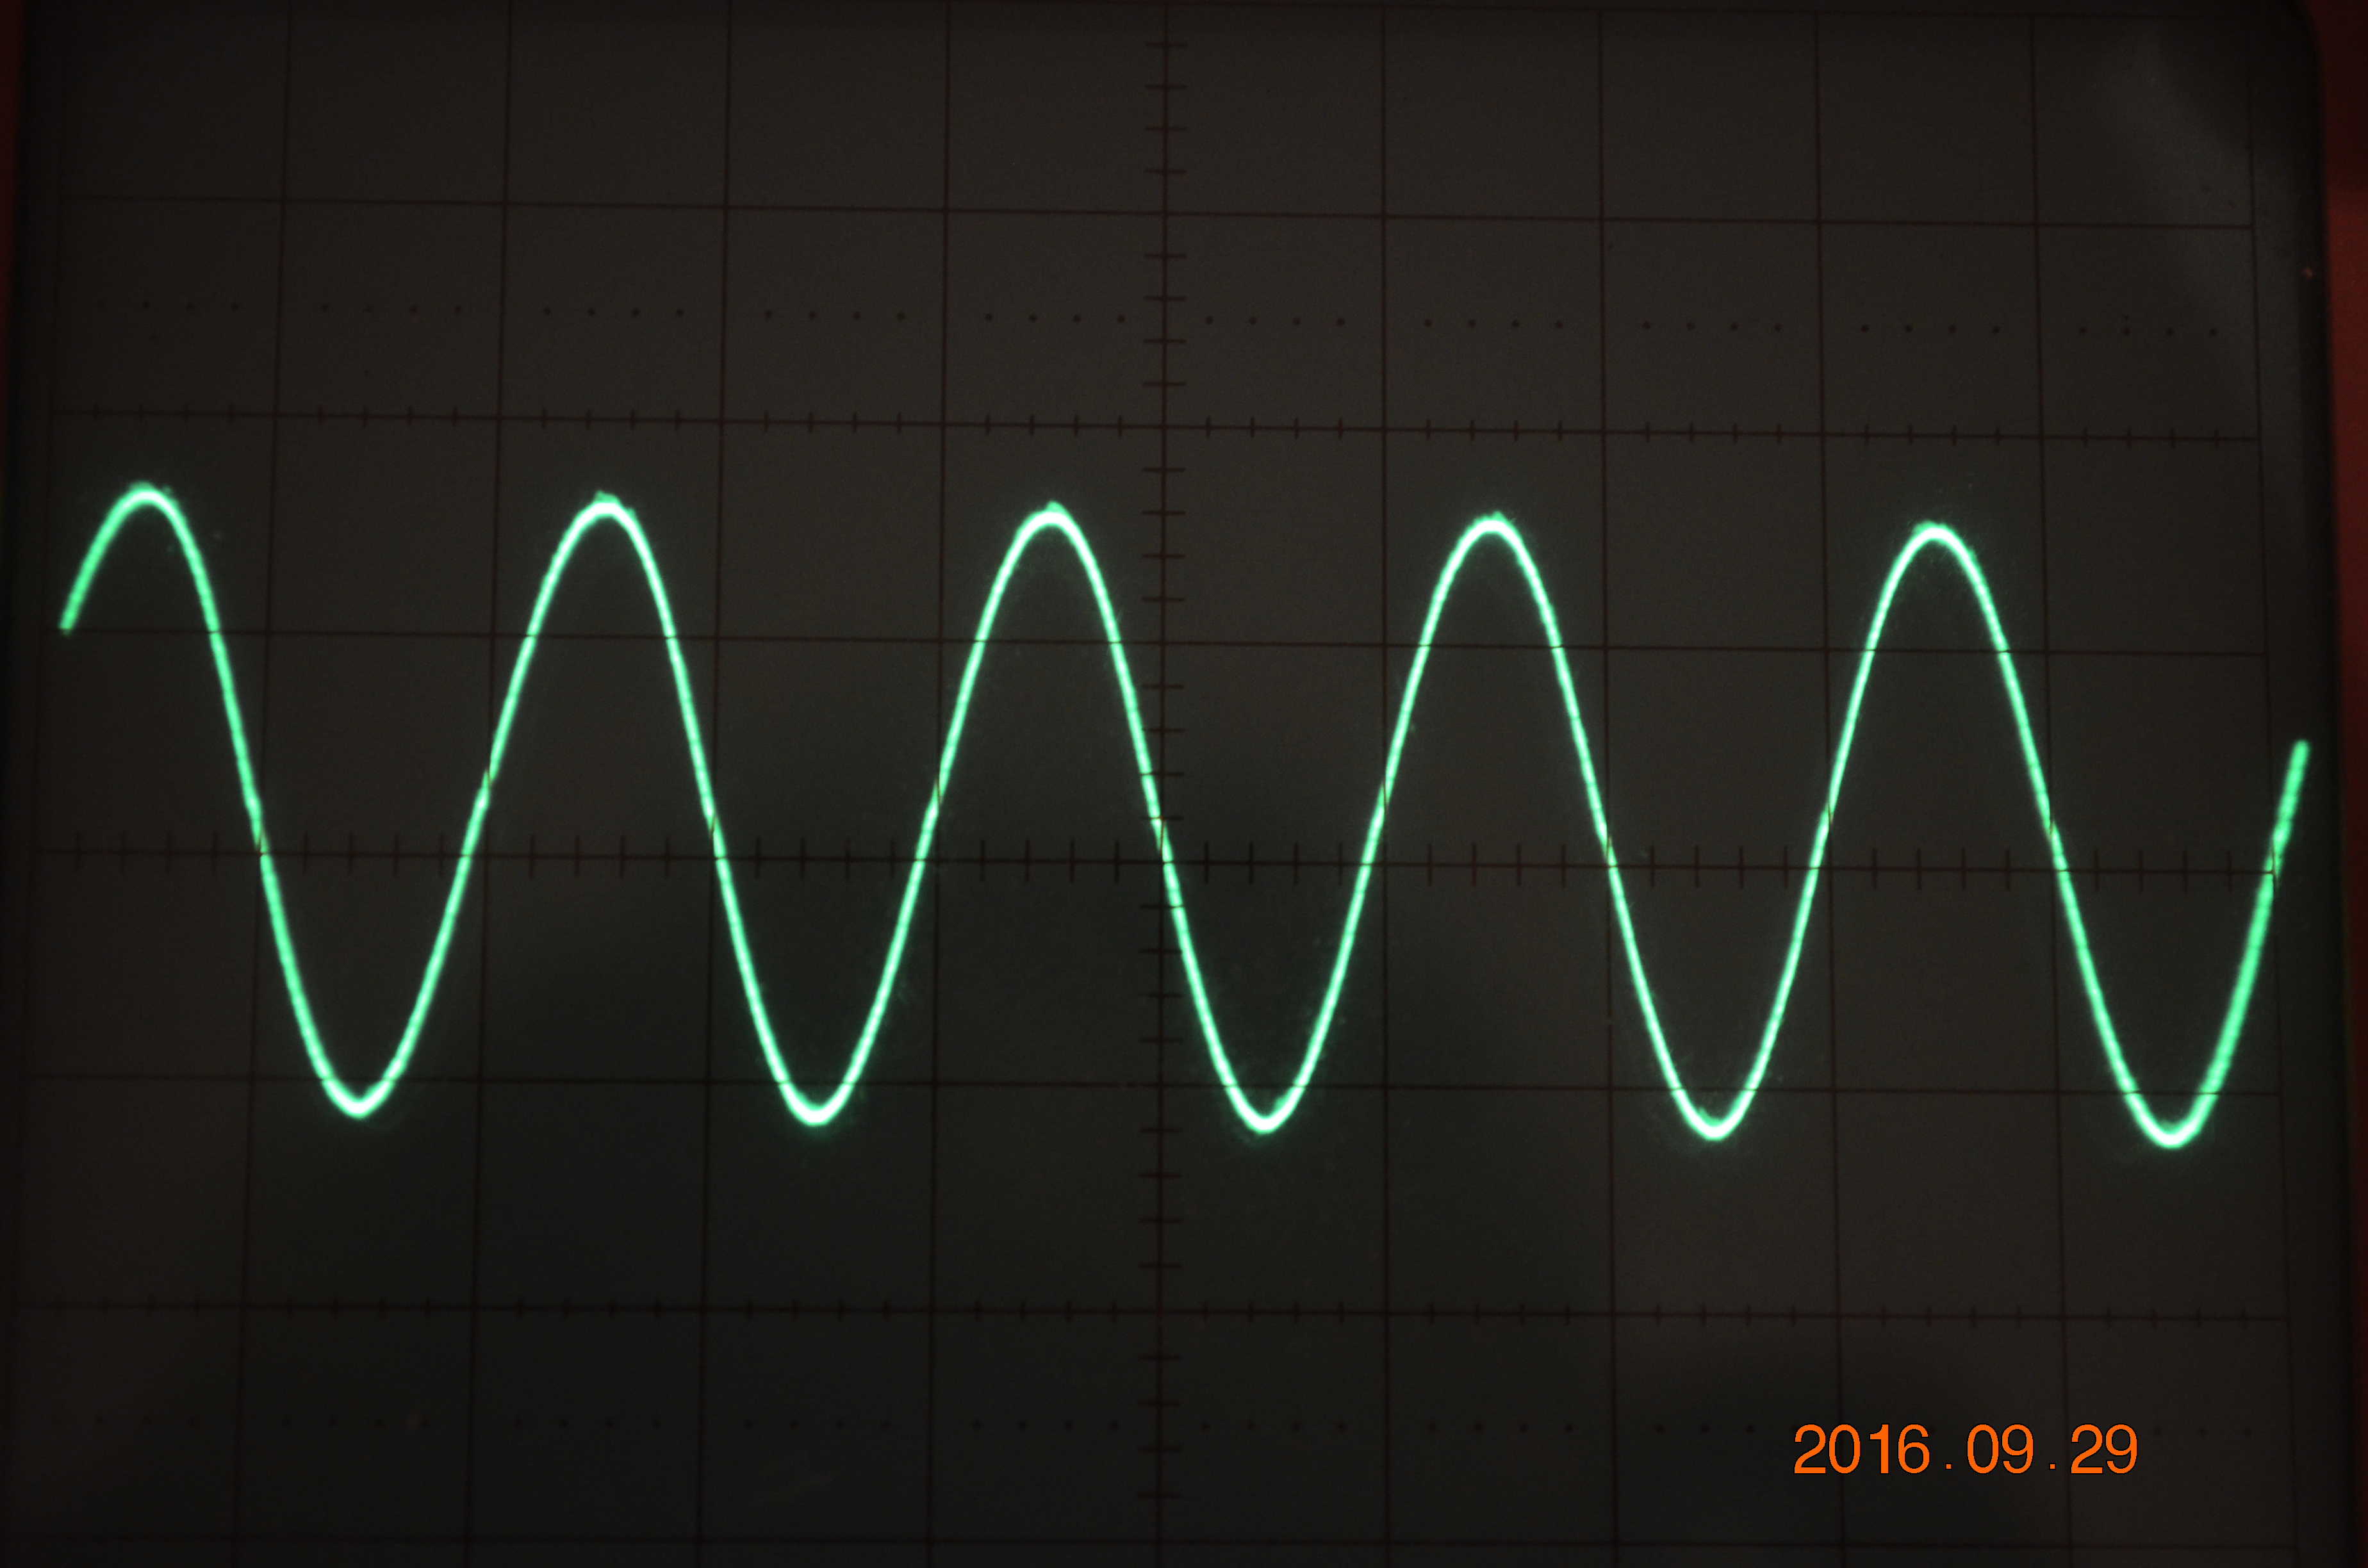
The next picture shows a half-sine wave. You will find here the source code that uses a table based approach for the sine curve. We take advantage of the fact that sine curves are symmetric. The table describes only 1/4 of a complete sine cycle. The rest is done by using the table backwards.
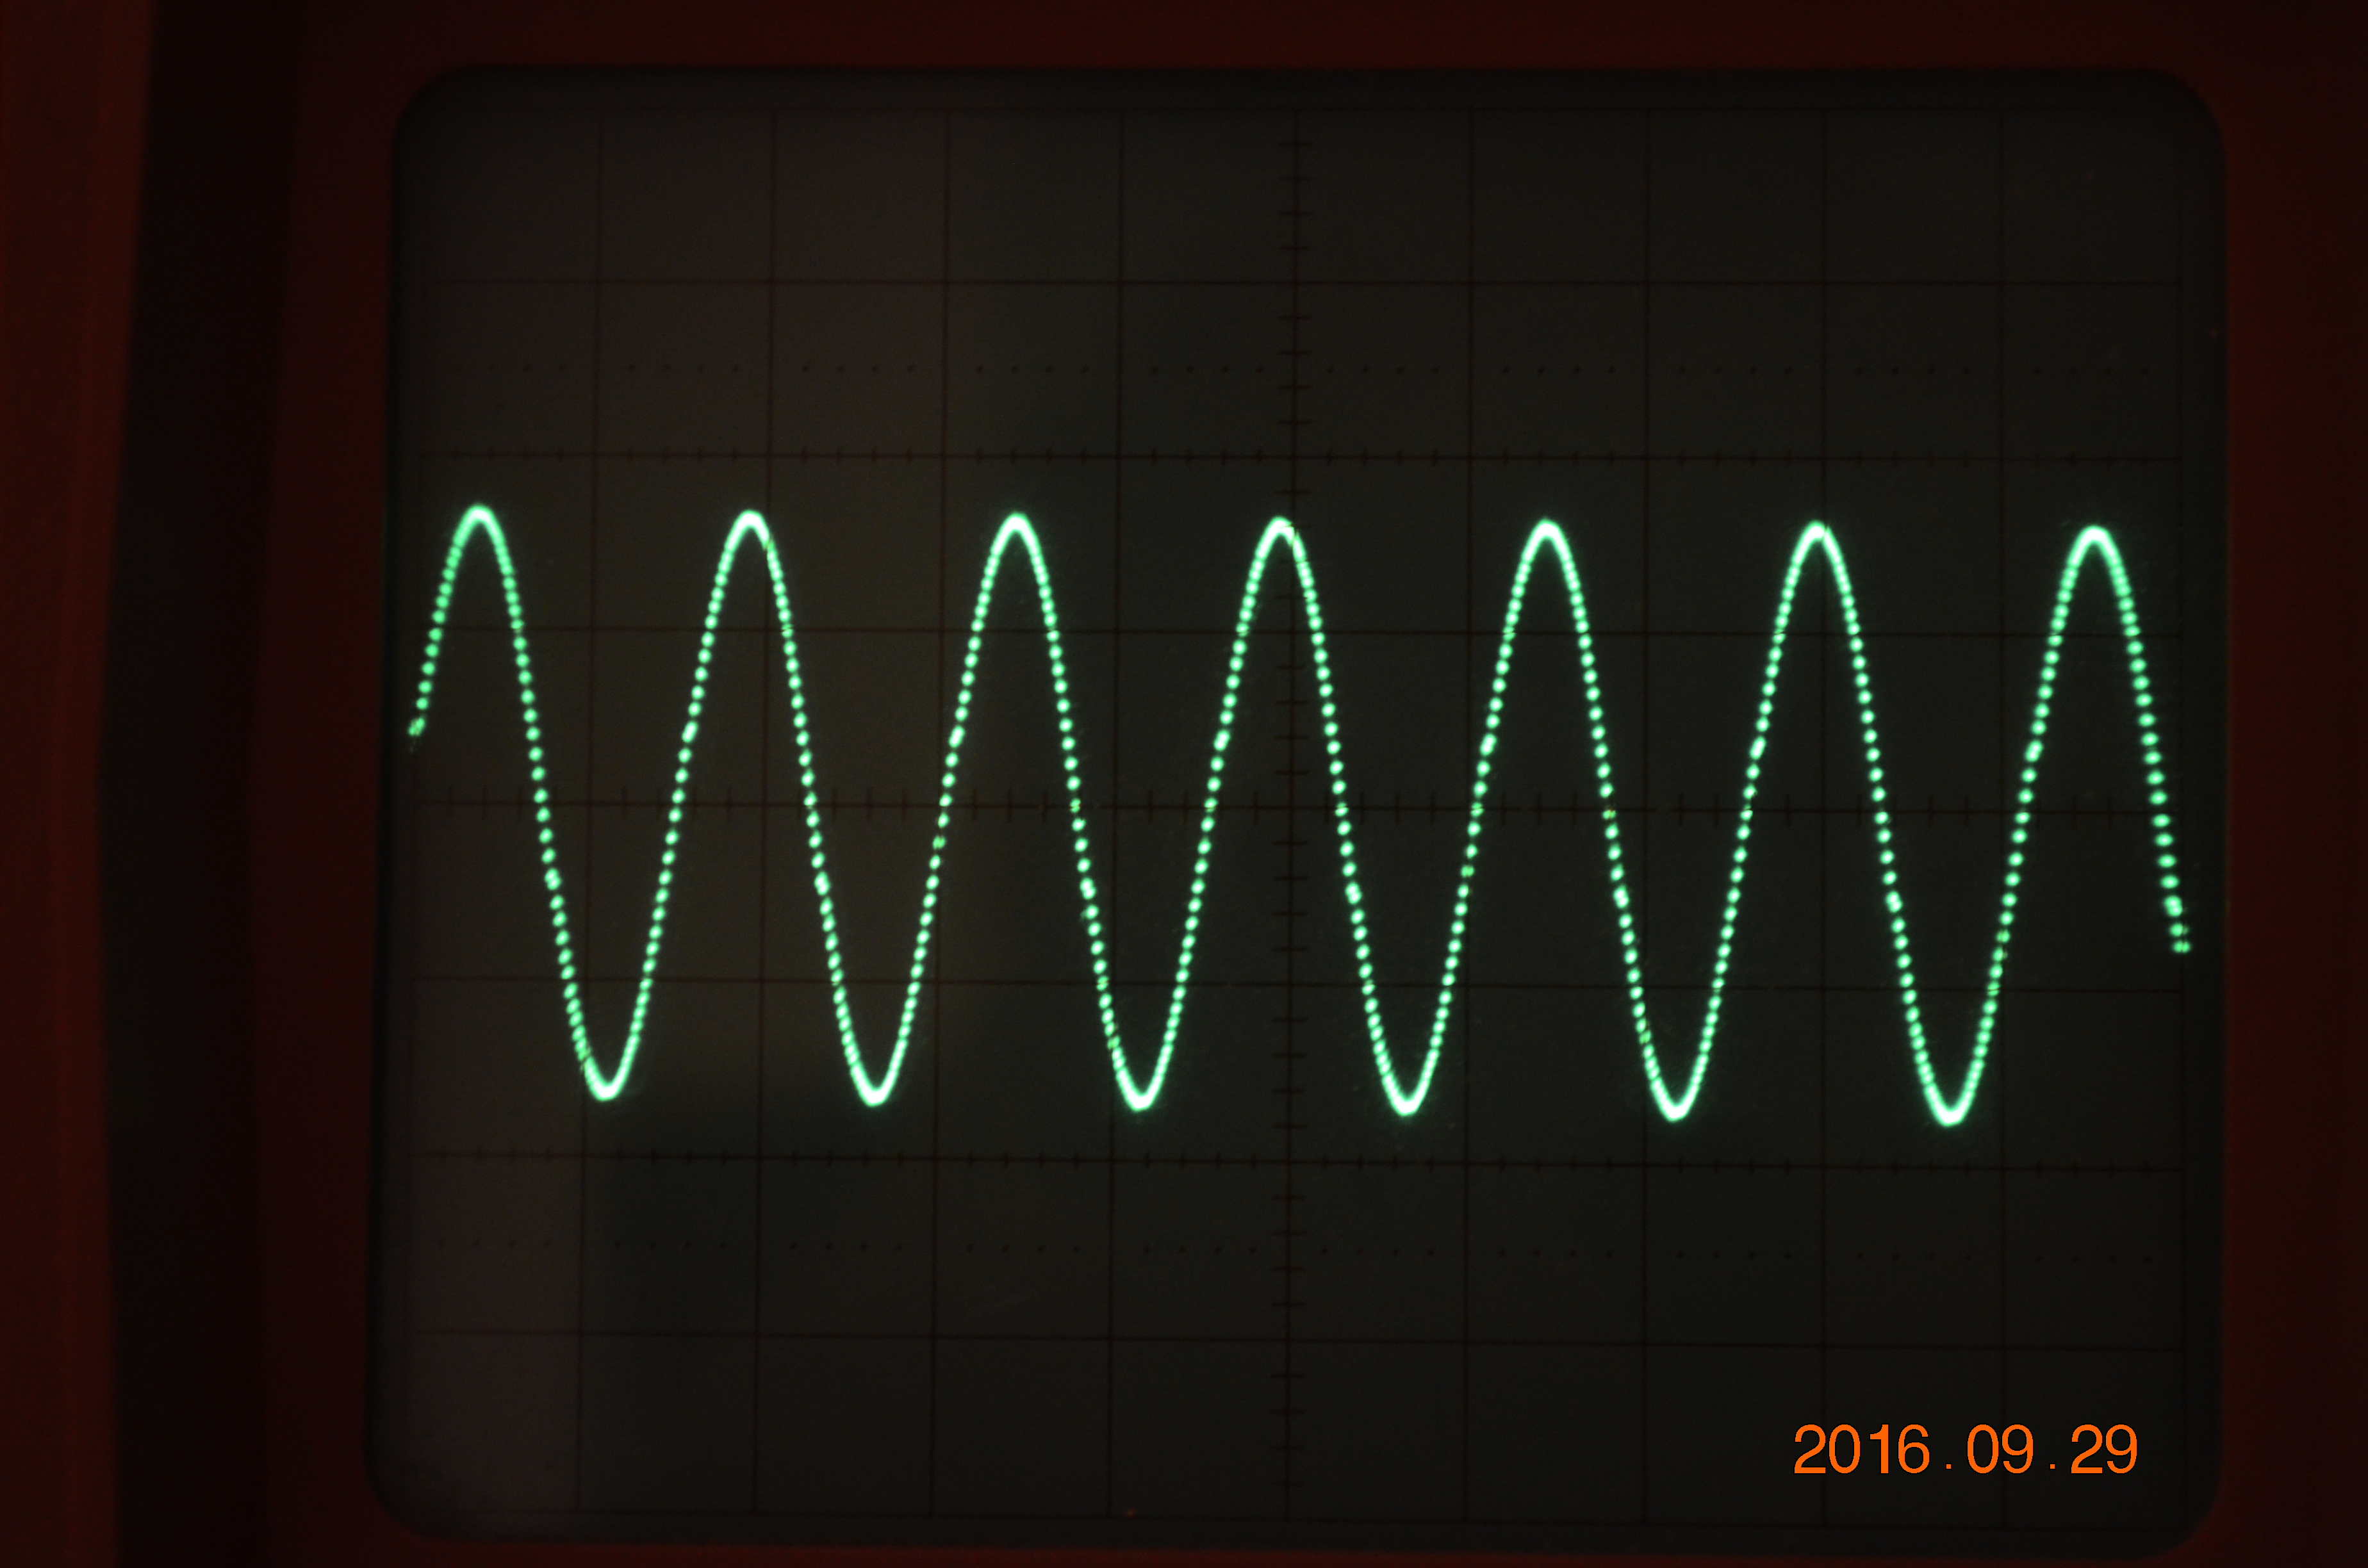
The next picture shows a perfect sine curve. Things in the Arduino sketch get even more complex as you now have to mirror the two last quarters of the cycle. This can be done by normalizing the table values into the range 127 to 256 for the upper two quarters and into the range 127 to 0 for the lower two quarters of a cycle. A complete cycle is run in 13 ms which gives 77 Hz for the frequency.
The chip NXP LPC1768 has tow major advantages over the Arduino:
My results show that these two advantages can be realized: with the C program shown here (I used the mbed IDE) I got the following results:
My method (certainly not new) is simple because it does not require UART chips nor libraries like the softSerial library on Arduino. If you don't need reliable data and if TTL level transmission over two lines (1 digital GPIO and GND) is sufficient for you then you should consider this solution (PDF document). The implementation is very simple and straight forward. The code for Raspberry, Arduino and NXP LCP1768 is included in the PDF link.
The sensor DHT11 is a cheap chip that delivers humidity and temperature values via a simple 1-wire protocol. There are many complaints on the net concerning the exactness of the obtained values. I have tested two DHT11s and indeed: they deliver different values. As the errors (compared to the more expensive sensor DHT22) are however consistent over time they can be corrected with offset values in the program. An important hint: with both DHT11 chips that I have tested I didn't get any fractional values neither for temperature nor for humidity (always 0) although the documentation mentions such fractional values. It may take several minutes until the DHT11 delivers usable results. The DHT22 is faster.
I have written this C program in order to get the basic values. They are output on a serial line and read with program TeraTerm. Note that this version doesn't use interrupts. In order to avoid endless polling loops I have used loops with a fixed endpoint. You have to adapt some constants in the program if you have CPU speeds that differ from mine. This has been testet with the small NXP LPC1768 board under the Internet based mbed IDE. The LPC1768 (ARM Cortex M3) runs with 96 Mhz CPU speed which is certainly oversized for this simple program. It has no operatings system in the strict sense. If you use a similar program in a Unix-like operating then expect to get unreliable results as background processes, interrupt service routines and scheduler routines may disturb the polling loops.
I wanted to compare some of my PCs and microcontrollers. Unfortunately none of the usual benchmarks were portable across all machines (I tested Dhrystone but had compiling problems and incoherent results). I therefore wrote an own portable bechmark. You find the source code here. This benchmark was written with the following goals an non goals in mind:
The benchmark program concentrates on three portable problems: simple integer arithmetic, simple double arithmetic and simple string handling. Using double arithmetic may be unfair as not all CPUs have floating point units. The string handling routine tries to avoid C library calls. C libraries can be implemented in very different styles: thread safe, using inline code (avoiding calls), using micro code etc.
Here are my results for the benchmark (program benchmark1.cpp). These results are for one CPU on the respective machine. I have tested different languages (C++, D) and different compilers:
Copyright for all images, texts and software on this page: Dr. E. Huckert